
How To Specify A Custom-Designed Instrument
By Jenice Con Foo, Mad City Labs

While it can seem daunting to design a custom instrument from scratch, a well-organized preparation effort and a knowledgeable industrial partner can simplify the process and, more important, greatly reduce its budgetary cost and time investment. Insufficient preparation often turns the collaboration between customer and industrial partner into a high-stakes game of “20 questions,” with the inevitable delays that back-and-forth leads to. This article is intended to guide readers through the process of — and understand the necessary preparatory steps for — defining a custom-designed instrument’s parameters. This process is presented in the context of developing a custom positioning solution.
What is Ideal, and What is Pragmatic?
It doesn’t matter if you’re designing a house, a garment, or a nanopositioner: any design process inherently involves compromises.
Custom designs require equal parts logical deduction and creativity, as a custom instrument customer will be asked to create both a well-defined “must-have” list and an imaginative, ambitious “wish list.” These lists represent the extreme ends of any compromise that may need to be made due to budget and time constraints, as well as performance demands.
A responsible, thorough approach allows all stakeholders to explore innovation while still meeting the custom instrument’s “get-it-done” demands. A good wish list also is prioritized in case instrument characteristics initially not thought feasible become viable later in the development process.
A capable industrial partner will generate a pair of solutions: one that meets the unit’s must-have characteristics and another that includes wish list features. This partner also should strike down out-of-reach demands while suggesting features that are more achievable than the customer may realize.
Sometimes, a custom solution’s starting point is self-evident. For example, researchers developing a new instrument may build off the legacy of previous designs, using an existing starting point and enhancing it with specific upgrades. This is where an experienced industrial partner is a boon, as it can be difficult to visualize, in a vacuum, how this unknown design will look (i.e., “how are you going to fit these specifications into something I know will fit in this space, look like this, and move in this direction?”).
For example, if elements of the customer’s wish list and musthave list are close to an existing product, the industrial partner can say, “I see on your must-have list a need to move a lot of mass; here is a product we’ve built before that handles a similar mass load, which we can use as a starting point for our design process.” In addition to giving the customer an anchor to understand how the custom product will work and move, a proven existing product used as the basis for a custom design puts to rest concerns about whether the solution will be effective.
For other custom solution projects, the starting point may begin with a question: “How can I make this instrument do this?” If these endeavors are to succeed, the customer and industrial partner must be in lockstep regarding must-have features and wish list priorities, and be equally committed to an organized approach that embraces creativity.
Regardless of the starting point, a custom solution project needs to establish three foundations: defining the solution’s basic specifications, determining a budget, and setting timelines. Customers with a clear idea of the limits and trade-offs in all three categories are likely to have an efficient custom design experience.
Determining Basic Specifications
Defining a custom instrument’s basic specifications means outlining the necessary performance criteria. This article uses a nanopositioning system as an example.
When setting the custom nanopositioner’s basic specifications (or those of any other custom solution), consideration of the component’s characteristics in the context of its role within the larger instrumentation is vital to developing an optimal design:
- Usage — How do you plan to use the positioner? Stated differently, what are your intended modes of use for the overall instrument? While this is seemingly a commonsense question, a clear answer will inform — and help to avoid confusion with — other design parameters Defining usage often is an exercise in refining usage from broad terms to narrow, application-specific terms. Taking an example from the first article in this series, imagine that you plan to buy a bicycle and ride it: your performance specifications include two wheels, handlebars, and brakes. However, will you be riding in the mountains — requiring shock absorbers, knobby tires, and a sturdy frame — or will you be riding on street courses, requiring instead thin, treadless tires, a lightweight frame, and gearing that favors speed over torque? Now, parallel that example to use of a nanopositioning solution: you need to move something, but is the overall instrument meant to scan samples fast? What does scan movement actually look like (e.g., 90 percent of the time, fast scanning will be required to build up this certain type of image; or, we plan to visit 10 sites on our sample media, and we have to be able to return to this starting point, but we are scanning very slowly)?
- Axes of Motion and Axis Travel Range — You must define the positioner’s number of axes and directions of motion: Will the nanopositioner just move left and right, or does it need to move in all directions, as well as up and down? When you say Z axis, do you mean up and down movement, or side to side? A diagram of what is meant by X, Y, and Z helps determine which design principles are applied. Consider, too, how far the positioner must move along each axis. Nanopositioners, for example, have some fundamental limits on how far they can move. To travel more than even a few tens of microns, they require some form of amplification, and the more amplification applied, the slower the stage moves (as an amplified positioner’s actuation requires softer springs).
- Mass Loads — How heavy is the typical load placed upon the positioner? That mass directly affects the platform’s stability of motion, as well as the speed at which it can move. Custom instrumentation is designed in exactitude, and it is insufficient to state, “I want the positioner to be as small as possible and as fast as possible.” Note that mass, stiffness, and distance of travel all are interrelated.
- Positioner Precision — This encompasses parameters such as resolution, repeatability, and step sizes. Equally important is ensuring that the customer and the manufacturer agree on how these parameters — particularly resolution and position noise — are defined.
- Dimensional Requirements —A customer should know exactly where a product is going to be placed so the manufacturer can build it to fit. Dimensional requirements generally are well thought-out, as the decision for a custom instrument may have been prompted by “this doesn’t have a hole big enough,” or “this is too big by 2 inches on one side.”
- Interface — This parameter includes connections to other instrumentation, as well as software running the instrument (i.e., is your existing software programmed to handle the custom stage’s expected movement?).
- Extraordinary Conditions — These include operation in an ultra-high vacuum or applications requiring the use of non-magnetic materials. Usually, there’s not ample space in a vacuum and special materials are necessary to meet the user’s needs; further, there’s rarely enough room for the cables and, in a vacuum, a system does not dissipate heat. Finally, designers may encounter a scenario in which the stage cannot be made of or contain magnetic materials; in such cases, the fasteners you plan to use cannot be magnetic, either.
Defining Budget and Timelines
A well-defined budget is critical to determining any design’s feasibility, and candor is the most vital part of the budgeting process. Not only does the customer need a clear understanding of their budget internally, they must share that budget with the industrial partner.
While many organizations may be apprehensive about openly sharing their development budget, doing so allows the industrial partner to better determine where compromises must be made, or where features that might otherwise have been discarded as out-of-reach may be fit for implementation.
Designing custom instrumentation is not like buying a used car. To wit, an unscrupulous used car salesman may hear your budget is $10,000 and try to sell you any $9,700 car on the lot. A custom solution partner needs budget information to objectively weigh what is necessary and feasible versus what is extraneous.
Further, just as an industrial partner might rule out a customer’s requests based on performance specifications, a customer might rule out an industrial partner based on a candid budget discussion (i.e., what is possible/can be delivered within a certain range).
“Timeline,” meanwhile, is a general term that hides a lot of intricacy. For example, custom instrumentation designers must consider the time needed to design the component, manufacture it, and complete final delivery. If you’ve requested help implementing the component into your system, that task must be included in timeline calculations, as well.
As with budgets, candor in a customer’s expected timeline versus an industrial partner’s projected timeline helps to set goals and expectations early in the development process. Additionally, consider that increased complexity in a custom design can cause lead times to vary. For example, typical lead times at MCL for custom instrumentation are approximately double the standard lead times.
Understanding Mad City Labs’ Process 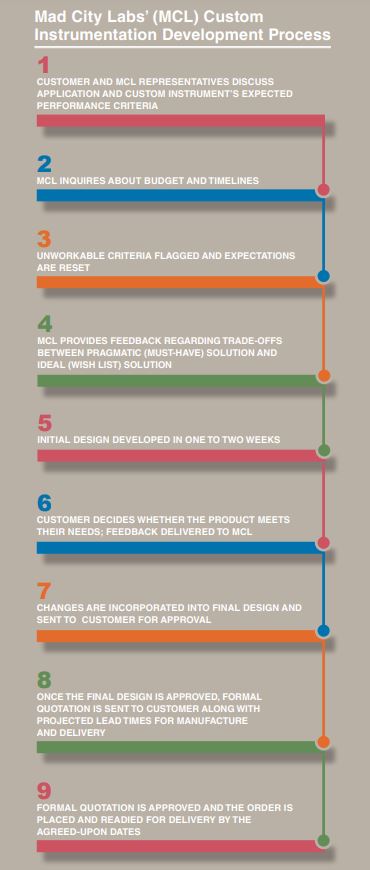
Putting the entire process together, let’s examine Mad City Labs’ (MCL) custom instrumentation development process as a case example. Assume the customer has defined their basic instrument specifications, budget, and timelines, as well as established a well-defined get-it-done list and an ambitious, prioritized wish list.
First, the customer and MCL representatives discuss the application and the custom instrument’s expected performance criteria. This early discussion is necessarily similar to an overview of the entire project and includes proposed budget and timelines.
Again, a competent design partner always inquires about budget and timelines, as these criteria determine the approach to the instrument’s performance specifications. In our experience, many customers pay close attention to technical performance but are reluctant to reveal the budget specification, which, unfortunately, does impact design choices.
This is the step where unworkable criteria should be flagged; for example, perhaps a customer demands a custom positioner be manufactured within two weeks, or sets budget restrictions prohibitive to the instrument’s requested performance. If necessary, all parties can use lessons learned at this point to reset expectations or pursue other avenues.
Next, MCL provides feedback regarding trade-offs between the pragmatic (must-have) solution and the ideal (wish list) solution. The customer can take this information to their project teams for internal discussion, allowing them to assist with finalizing specifications.
Assuming all specifications and the budget have been welldefined, and all stakeholders remain candid and responsive, an initial design can take as little as one to two weeks to develop. The initial design is based on the agreed-upon specifications; generally, this comprises a dimensional drawing implementing the proposed performance specifications. At this point, the customer should decide whether the product meets their needs, including its ability to interface with other equipment (i.e., are the cord lengths correct, does it require metric/ imperial mounting hardware, etc.?).
Once all feedback is received, changes resultant of the customer’s initial design review are incorporated into a final design, which is sent to the customer for approval. Once the final design is approved, a formal quotation is sent to the customer with projected lead times for manufacture and delivery
When the formal quotation is in-line with the customer’s expectations, the order is officially placed and readied for delivery by the agreed-upon date(s). In some scenarios, installation may be a part of the process; this would have been specified at the project’s outset and incorporated into the product price. For example, MCL’s single molecule microscopes are offered with installation, as the applications are nearly always customized. The pieces of equipment themselves may not be custom, but the way people use them is.
Conclusion
The typical cost and timeline for developing a custom design is largely dependent on how well the customer prepares for the process’ initial steps. Projects with well-defined specifications — and an understanding of limits and trade-offs relevant to the instrument — provide the best input for an industrial partner.
As a result, less back-and-forth communication is necessary between the customer and industrial partner, saving valuable time and, ultimately, money. Misunderstandings and errors in these initial steps typically are the largest barrier to custom solutions being chosen by customers.
Clearly defined budgets and timelines also are an integral part of the initial criteria, and they contribute to an efficient design and solution. When you combine each of these elements, a custom designed solution need not be significantly more expensive (financially or timewise) than an off-the-shelf alternative.
About The Author
enice Con Foo is a member of the technical sales and marketing team at Mad City Labs. She obtained a Ph.D. in Physics from La Trobe University (Australia), followed by positions at the Synchrotron Radiation Center and the University of Wisconsin-Madison. Her research background is in experimental condensed matter physics and ultra-high vacuum instrumentation.
About Mad City Labs
Mad City Labs designs and manufactures a complete product line of high precision piezo nanopositioners, micropositioners, atomic force microscopes, and single molecule microscopes. We provide innovative instrument solutions from the micro- to pico-scale for leading industrial partners and academic researchers. Visit www.madcitylabs.com or email mclgen@madcitylabs.com for more information.