The Do's And Don'ts Of MBR Pretreatment

By Kevin Westerling,
@KevinOnWater
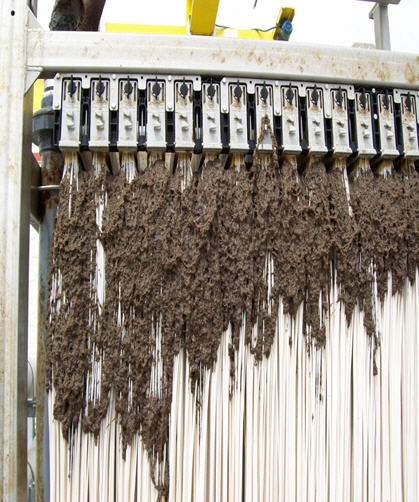
They say a picture's worth a thousand words. If that's true, this image of a fouled membrane bioreactor (MBR) system needs little prelude — it's simply what happens when you don't properly protect your membranes with pretreatment.

Although this appears to be an extreme case, it’s easy to see how this can occur considering that just 1 ppm (1 mg/L) of hair, fiber, or related debris adds up to the following volumes:
- 8.35 pounds (3.9 kg) per MGD/day
- 58.45 pounds (27.3 kg)/week
- 249 pounds (113.2 kg)/month (30 days)
Advantages And Disadvantages Of MBRs
MBRs are becoming more popular for benefits such as better effluent quality, smaller space requirements, and ease of automation. But they also have disadvantages, which takes us back to the image above — a sight that can make operators wish they never switched from conventional treatment. If MBRs aren’t properly protected, they typically have higher operating costs than conventional systems due, in part, to O&M associated with membrane cleaning, fouling control, and eventual membrane replacement. Pretreatment via screening (pre-screening) can mitigate these problems, allowing operators to turn their focus back to MBR’s advantages.
How Much Protection Do I Need?
According to James Impero, a senior engineering specialist for Ovivo, fine screens with apertures of 2 mm to 3 mm are the bare minimum for protecting membranes, but will only remove two-dimensional solids. Ultra-fine screening (0.01 mm to 1 mm) can better approach three-dimensional solids removal and protect the membranes from hair, fiber, and filamentous algae and larvae.
He also noted, however, that MBR facilities with screens 2 mm or finer and flows of at least 2 MGD must also add larger-aperture screens and grit removal upstream. Otherwise, the fine screens will blind quickly, bypass solids through holes and seals, and experience excessive wear.
“Membranes are a very expensive investment,” said Impero, speaking at the 2015 Membrane Technology Conference & Exposition, “[and] their only protection is a series of protective coarse and fine screens and grit removal systems.”
While Impero recommended the Ovivo® Duet™ system, a two-in-one unit that combines a course screen (3 mm or 5 mm) with very fine (0.3 mm to 1.8 mm) mesh screening, he noted other MBR pre-screening options, including:
- Spiral screw gravity flow stationary screens
- Gravity flow rotary drum screens
- Internally-fed pumped flow drum screens
- Center flow and dual flow band screens
- Single- and double-entry gravity flow screens

The Ovivo Duet dual aperture screen
Do’s And Don’ts
Whatever your choice of screening, Impero provided the following rules of thumb:
- Always install membrane screens post coarse screening to reduce blinding.
- Always install membrane screens post grit systems.
- Never put a grinder, comminuter, or cutter shredding device anywhere upfront of membrane screens and membranes. (According to Impero, they will create small, sharp plastic projectiles, fibers, and rope that “will cause serious problems at the membranes.”)
- Never exceed peak flow velocity of 1.5’/second at screen panels for 3 mm and 2 mm membrane screens, and 1.2’/second or less for 1 mm screening and smaller (with proper upfront coarse screening).
- Perform “sieve tests” once per month.
How To Perform A Sieve Test*
Impero and Ovivo worked with GE Water & Process Technologies to come up with “the simplest process to test screening efficiency”:
- Assemble a stack of sieves of the following sizes (largest sieve on top):
- 2.00 mm (ASTM No. 10)
- 1.00 mm (ASTM No. 18)
- Collect from a sample port and carefully pour a known volume (60 to 200 L) of representative mixed liquor through the sieves. The correct volume of mixed liquor to use for the test will depend on how much material is collected on the sieves. The key is to use a sample volume that is large enough to ensure that enough material is collected to be easily weighed. For a very clean or very thin (low mixed liquor suspended solids [MLSS]) sample, this may mean a sample volume of 200 L (50 gal.) or more. For a very dirty or very thick (high MLSS) sample, this may mean a sample volume of 60 L (15 gal.) or less.
- Pour clean water through the sieve periodically (if necessary), taking care not to lose any screenings by spraying them out of the sieves.
- Shake the sieves gently and wash through with clean water to rinse away the biomass and to clean the collected screenings.
- Record the weight of each of the empty trays (in grams).
- Separately collect the screenings from each sieve, and transfer to pre-weighed aluminum trays.
- Dry the trays of screenings in an oven at 105°C (221°F) for a minimum of 8 hours, or overnight.
- If the MLSS of the sample is not known, then a separate sample of the same mixed liquor should be collected and analyzed for MLSS.
- Weigh the trays again to determine the dry weight of the screenings. Record the weight of each tray in grams.
- For each sieve size, calculate the screenings concentration using the following equation:
(weight of tray plus dry screens [grams]) - (weight of empty tray [grams]) x 1000 / sample volume (L) = mg/L
*Credit: GE Water & Process Technologies, “SERV-0073 Sieve Test WW Solids Procedure” (2009)
Final Thoughts
Though performance testing is important once your screen is installed, the more important work is selecting the right pre-screening in the first place, reminded Impero. “A screen is not just a screen,” he said, adding that modern design tools such as computational fluid dynamics (CFD) are an “absolute necessity” during the planning stage. He also warned planners to be wary of excessive flow velocities, and always size the screening for peak flow.
For all Impero’s tips, recommendations, and warnings, the overarching message is the same: protect your investment.
Further reading:
